-
 Graphical User InterfaceIntuitive in real-time
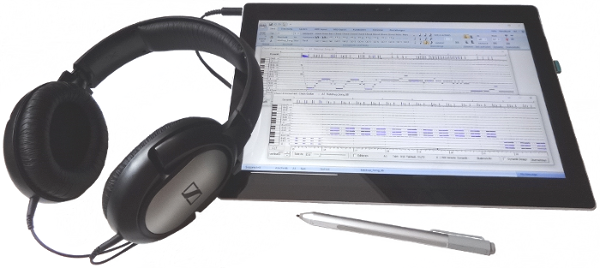
So that you hit no musical boundaries
nimbu represents music in all its diversity. Many suggestions from our customers have been incorporated into its development, leaving almost nothing to be desired.
nimbu is a highly advanced real-time system. In the interest of the music, real-time performance is given absolute top priority. Therefore, the graphical user interface must not consume too many system resources, which has been achieved perfectly. No other real-time arranger offers you this variety of features.
At this point, we will give you a complete overview of all musical performance and editing possibilities. These are so powerful that they cannot fit onto a single screen. Therefore, a clearly structured user interface is crucial. In particular, playing must be separated from editing and settings. In the nimbu Performance Mode, a single screen is completely sufficient for playing. In this mode, you can even play entirely without a screen, using only a master keyboard. You can also configure nimbu to meet your requirements for practicing. After all, practicing is quite different from performing live.
Inspired by Office products, the entire user interface is designed in accordance with user expectations, featuring tabs and context-sensitive ribbons. If you want to examine your music in more detail or even edit it, this clear structure will guide you directly to everything you need. This also includes a convenient Undo/Redo function, which allows you to reverse any changes made to your music.
However, nimbu is not a single-window application. There is no restrictive user guidance. All windows can be opened simultaneously as needed and arranged across one or two screens to monitor the music across all instruments and levels in real time. During editing, the windows update automatically with one another. Each window has its own Undo/Redo stack.
nimbu offers English and German language settings, each featuring four user interfaces (UIs) for different color styles.
The user interface also includes high-quality documentation. For every tab you open, as well as for every window you are currently working in, you receive context-sensitive help with cross-references. However, in the beginning, you will only need a fraction of the features, as nimbu performs important processes automatically while automatically loading or setting the corresponding information on its own.
After launching nimbu, the Edit tab of the ribbon bar is opened. nimbu uses a tape recorder icon for the tracks. Your accompaniment instruments, which you play with your left hand, are represented as small 1-octave keyboards. The drums are assigned a drum kit icon. This iconography is consistent throughout nimbu.

After you have selected an appropriate section, you call up the individual instruments and tracks. In nimbu, you can leave all windows open at the same time. For the sake of clarity, a maximum of 2 windows of the same type and section are allowed. For example, if you click on the instrument symbol Chord 2, the following window will open.
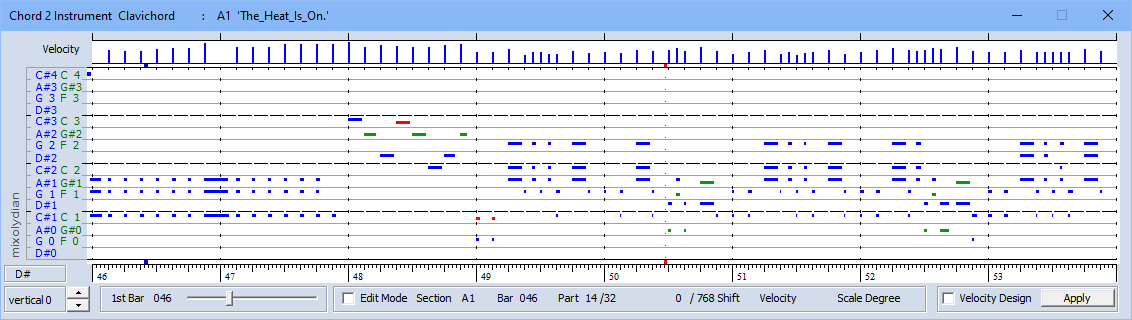
You are currently in the graphic window of the Chord 2 accompaniment instrument, which you can edit using the mouse. The events are displayed as horizontal bars. The blue events represent the chord tones or the upper scale degree, while the green ones represent the harmonic tensions or the lower scale degree. The red events are non-diatonic tensions. You use these scale degree events to play everything just like regular notes.
The velocity level of the events is located at the very top in blue, showing the average value for this specific trigger time.
The chord currently playing is displayed in the bottom left corner. Directly above it, the corresponding chord tones are shown in blue letters. Next to them, in green letters, are the tensions derived from the chord scale assigned to this chord, which is displayed vertically on the far left. These are the notes that can be musically played over this chord. This display updates in real time during playback or during playback simulation via the Walk-Through Panel, so that every note of the accompaniment is shown depending on the selected degree of improvisation.
Timelines are located above and below the event area, displaying the current playback position in real time using two red markers connected by a red dashed line.
The respective bars, including their bar numbers, are located below the lower timeline. This division immediately indicates the time signature, which can vary throughout the piece. During playback in 4/4 time, the display wraps around after the 6th bar, causing the real-time markers to start over from the beginning. You can shift the octave range, which spans 8 octaves, incrementally up and down using the vertical keys. Alternatively, you can easily scroll in any direction using the mouse wheel (hold additionally for vertical scrolling) or by swiping on a touchscreen.
Events are edited individually or as a selection, with note length, velocity, etc., being configured in the Edit tab. Furthermore, you can index entire event ranges and process them further using cut & paste.
You will find this type of display - with bar divisions and timelines that mark the playback position in real time - in all event views. In Drum 1 and Drum 2, the individual percussion instruments are displayed instead of the chord resolution. This also applies to the tracks. In the other tracks, the absolute notes are listed.
The compact Event Track follows as another example. It is the only window in nimbu that contains so much information. In return, it allows you to conveniently edit all time-based changes in one central location, including chords, markers, program changes, time signatures, etc., which are independent of your accompaniment with its scale degree events.
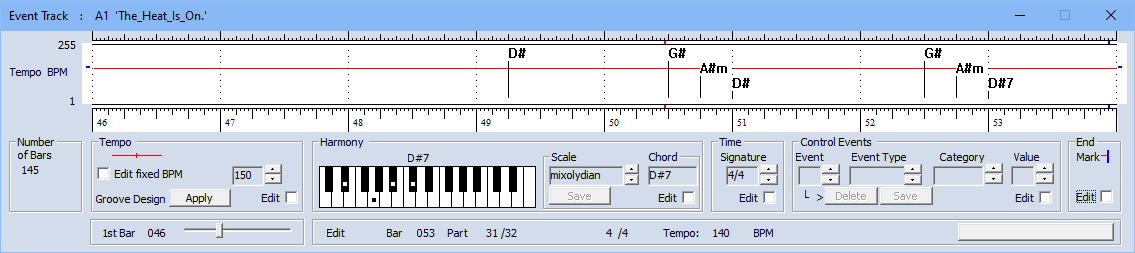
In this view, the horizontal red line represents the temporal progression of tempo changes. Furthermore, the chords of the harmonic progression are displayed. These are the chords you use, for example, to play the Chord 2 accompaniment instrument above. The timelines showing the playback position in real time are also clearly visible here. This allows you to see exactly when each chord is to be played. In addition, the keys to be played are displayed on the nimbu Demo Keyboard (Perform tab). If you are playing with single-finger mode, nimbu will only show you these keys.
What you see here in the last two images is the result of a MIDI file import, followed by the calculation of the harmonic progression and the transition of an instrument into the nimbu Chord 2 accompaniment instrument. Of course, this is just a tiny excerpt. The calculated accompaniment (The Heat is On, Harold Faltermeyer and Keith Forsey) consists of 7 instruments across 143 bars. An accompaniment like this has real drive and invites you to improvise. You can listen to it in our Audio D. However, the experience of actually playing it is something you can only discover for yourself.
You can also ask the AI for the chords of your song and enter them here. Afterwards, you can have nimbu recalculate the chord scales and instruments. The only prerequisite is that the key of the chords provided by the AI matches the key of your MIDI file.
So much for the first impression.
Now, we will continue with a brief description of all tabs in the nimbu ribbon. Don't worry, as mentioned before, you will only need a fraction of the features, at least in the beginning.
We will start once again with the Edit tab.
Edit Tab
This is the tab where you can view and edit your music directly. In this tab, the scale degrees of the instruments and the notes of the tracks are edited.
Clipboard
Select Events is the setting to index event areas with the mouse.
Functions to cut, copy and paste indexed event areas or selected bar areas
Section
Defines the section to be edited, the entire sequence or parts of a sequence. Assignment of a corresponding title, which is displayed in all windows.
Instruments and Tracks
Opening the windows for nimbu instruments and tracks across all categories in the previously defined section or sequence.
Note Length
Setting which note length is to be edited for the events.
Voices
Setting whether a single note, an interval or a 3- or 4-voice chord should be edited when inserting and deleting events.
Fill up Bar
Setting whether and at what interval the remaining bar should be filled up with events using the set values.
Velocity
Setting which velocity value should be edited for scale steps and note events.
Scale Step
Setting, which scale step should be assigned to the indexed events.
Control Tab

In this tab you define how nimbu is controlled when playing.
Mode
Indicates the mode you are currently in: Compose or Accompany.
In "Accompany" mode, the 24 sections in nimbu have their own tracks across all categories. The sections run synchronously to their tracks, which is indicated here by two sections. Each individual section records a complete accompaniment, so that up to 24 accompaniments are available for playing in one session. 12 of them even in real time via the touch panel (S1 to S12, see below).
In the "Compose" mode, the sections are lined up to form a sequence like in a construction kit, whereby loops (shown here in red) can also be defined. The tracks are tracks of this sequence. For example, the melody track runs through while the played accompaniment is composed of a sequence of different sections. The sections form the sentence structure of the composition.
Control via Setup
Calling up windows for editing the temporal control events for tempo, chords and markers such as intro, main etc. as well as the static time signatures and bar counts of the sections in composition mode. Here you can also set the sequence of the sections to be played for both modes and, in Composition Mode, for each section the inheritance of events from another section.
via Keyboard, Pads
Calling up the windows for editing the events to be controlled from the keyboard during playing, such as start/stop, jump to another sequence part or to another marker, switching individual instruments on and off, tempo faster or slower etc. The events are either assigned to the keyboard keys or to the switches and knobs of MIDI controllers, pads or master keyboards. More than 100 different nimbu event types are available for these assignments. Control is done via MIDI Control Change, Program Change, Pitch Bend or NoteOn or NoteOff messages. nimbu also supports the HUI and MCU (Human User Interface, Mackie Control Universal) protocols known from DAWs (Digital Audio Workstations). After activating a control element, the MIDI message is displayed and immediately assigned to a nimbu event. Furthermore, the control of the LEDs and displays on master keyboards is configured here.
Playing Chords
Setting the automatic chord recognition: Four single-finger settings that are based on the settings of common keyboard manufacturers and have been expanded slightly, 3-voiced, 4-voiced, 3- and 4-voiced, and accordion. Settings that a special procedure of keyboard styles is switched on "on the fly" automatically during transposition and that the chord presetting comes also from the EventTrack. Further settings, which basic chords are assigned to the keys C sharp and D sharp in the single-finger mode, that in the 3-part chord recognition the minor version of the 7-5 chords is used, and that in the chord resolution Major Sex chords are interpreted as inversions of minor seventh chords.
The Chord Display shows all chord fingerings, including inversions, which nimbu resolves when playing in the current setting. Several hundred chord fingerings are displayed. In addition, all major and minor keys with their seven scale degree chords and their assigned chord scales can be set and played directly in the chord display. The keys can be scrolled through according to the circle of fifths.
at the end of a note
Defines the remaining time until the end of the note at which no more transposition takes place during a chord change. Since the chords change much less frequently than the notes of the accompanying instruments, this important setting prevents notes of the accompaniment that have already been played from being retriggered or shifted in pitch when a new chord is played.
Direct
These switches set how the left hand on the keyboard directly controls the accompaniment.
Hard Sync
Determines whether SyncStop stops hard or immediately and not only when the end of the bar is reached.
Retrigger
Specifies that new chords always cause retriggering or restarting of the events already played. This setting overwrites the individual instrument settings.
Bass Inv
Switch on bass inversion to interpret played chord inversions as slash chords and thus specifically control the bass.
Play Tab

In this tab you see or set what nimbu should play. It is a tab in which you can quickly make these settings when editing. You can also use the Session Panel in the Performance tab.
Select Instruments, Tracks und Keyboard Areas for Playing
For each category either instrument or track can be switched on for playing. In addition, you can set here whether notes played on the keyboard are forwarded to the sound generator.
Select Marker
Markers are song positions that can be jumped to at the start or while playing. If an intro has been activated, nimbu starts with the intro and then continues playing with the corresponding main. By setting the Intro and Main, nimbu enters the so-called Marker Mode at the beginning of playing. With each new marker request, nimbu plays the current bar of a Main marker to its end, and then jumps to the accompaniment of the new marker. With AF or DF Auto Fill In and Drum Fill In are switched on. With Auto Fill In, when a new Main Marker is activated, the Fill In of the current Main Marker is played first, and then the new Main Marker, which can also be the old one, is played. When Drum Fill In is switched on, only the drums are played by the Fill In at any time, while the Main accompaniment is continued. In nimbu, you can seamlessly jump from one marker of an accompaniment to another marker of another accompaniment while playing. The instrument setup for the new accompaniment is done "on the fly". The bridge markers are intended for professional transitions from one accompaniment to another. Bridges and endings are always played to the end, so that there is enough time to set the target marker in the new accompaniment while playing.
A special feature of nimbu is that the marker sections can also be closed with "NoMarker", which means they do not have to be lined up next to each other. Consequently, there can be bars between markers that are not assigned to a marker. This makes it very convenient to set markers even in an accompaniment derived from a MIDI file.
Play
Adjustment of the starting tempo and the bar with which, for example, certain parts are to be started for practising, as well as Play/Stop or Sync Stop function to do not only start but also stop playing with the left hand.
Improvise
Switch, with which level of improvisation should be played. Title means that the accompaniment is played title-related. With a scale-related accompaniment, musical improvisation is possible. With a chord-related accompaniment, on the other hand, the possibility of improvisation is made possible by the reduction to chordal tones, which is not improvisation in the musical sense.
Recording
Switch for recording from the keyboard, specifying the track into which the recording is to be made, and switch for recording the chord progression. Instead of the melody, accompaniments can also be recorded. Note events recorded from the keyboard are recorded in real time in the corresponding track window, making this function ideal for replaying a given track. nimbu even records the notes played below the notes to be played if practice is activated in the Features tab. Recording of the complete accompaniment is also possible and can be activated with a further button in the MIDI Export tab.
MIDI Import Tab

In this tab, you import a MIDI file to create an accompaniment that you play yourself with the chords of the left hand. You can also import YAMAHA® styles in this tab. nimbu automatically recognises whether it is a MIDI file or a style file by file extension.
YAMAHA® styles can also be loaded and played directly by checking the box Direct in the Style Import group of the Setup tab.
1. Import
Loading of individual instruments, song text, time signature changes and tempo changes and markers from a selected Midi file or keyboard style into corresponding nimbu tracks. Keyboard Styles can also be loaded completely here.
2. Select Tracks to Process
Display of tracks already occupied by note events and selection of tracks for further processing.
3. Harmony
Calculation and storage of the harmonic progression of the accompaniment and indication of the key, if this can be clearly determined.
Instruments
Conversion of the nimbu tracks into nimbu instruments, whereby the harmony progression is deducted so that in the nimbu instruments the accompaniments are left as chord scale steps that can be played with any chord scale.
Selected Tracks
Octave
The events of the selected tracks Bass to Melo 2 are moved up or down by one octave.
Delete
The events of the selected tracks will be completely deleted.
Quantize
The selected tracks will be quantized to the set value.
All Tracks
|----------Shift >
Time shifting of the events of all tracks from a certain bar and a certain bar part by a number of 32ths.
Semitone
Transpose all tracks with note events one semitone up or down.
MIDI Export Tab

In this tab you export your nimbu session as MIDI file.
Target Section
The target section is defined here for the following functions.
1. Compute Section
Transferring the events from the sequence of sections of a composition to the specified target section with simultaneous switching to Accompany mode
2. Record Playing
The playing of the entire accompaniment is recorded in tracks of the target section. These tracks then contain the full accompaniment as played with the corresponding chord progression, whereby the current instrument setup is also copied to the target section.
3. Select Tracks to Expor
Display of the tracks occupied by note events and selection of these tracks for Midi export.
4. Export Tracks
Entry of the Midi file name to which the export should take place and execution of the export.
Style Export Tab

In this tab, the nimbu accompaniments are exported as YAMAHA® SFF 1 or SFF 2 styles to play them as close to the original as possible on a YAMAHA® arranger keyboard.
Usually the accompaniment is already available in nimbu, so it's just a matter of playing this particular accompaniment on an arranger keyboard as well. This way is relatively easy, because hundreds of settings are not necessary. Finally, the accompaniment is processed completely in its full musicality directly in nimbu. For an imported YAMAHA® style, these settings are already available in nimbu. Since, for example, the styles on most YAMAHA® keyboards can only be played in a single time signature and also do not know the required chord scales, some preparations have to be made to get as close as possible to the nimbu session.
Source
This indicates whether the source of the accompaniment is a MIDI file (or your own composition) or a YAMAHA® style. A YAMAHA® style is saved immediately in the 4th group.
For other accompaniments, the following settings must be made.
1. Select Marker
The marker sections for which the settings are to be made are selected here. For a title-related style, it is sufficient to make the following settings for all markers.
2. Assign nimbu Instrument to Style Part withNTR + NTT
HHere the individual nimbu instruments are assigned to the style parts SubRhythm, Rhythm, Bass, Chord 1, Chord 2, Pad, Phrase 1 and Phrase 2 of the style. The check mark at Original Scale indicates that the original tensions have to be taken over as well.
NTR refers to the so-called note transposition rule. In this tab, it only has the settings "Root Trans" and "Root Fixed". This setting determines how the root of the accompanying instrument is created when playing a chord. NTT is the so-called note transposition table. This setting determines how the chord type of the played chord affects the accompanying instrument.
With these simplified settings, Style Export generates the so-called CASM section of the YAMAHA® style. However, nimbu also supports all other YAMAHA® transposition types, such as NTR Guitar. These must be assigned in the Transpose group of the Setup tab.
Since in nimbu the events of the accompanying instruments are already separated from the chords of the harmony and in addition their chord tones are distinguished by color from the tension tones, one recognizes on the basis simple rules very fast, which settings are to be made per style part. These simple rules are part of the nimbu documentation.
3. Settings
In this group the settings of the nimbu instrument for the style part are saved or deleted again.
optional: Edit Marker Convert TimeSignature
In this group, the set marker range is edited for the style export.
Reduce
Here, individual marker ranges of a nimbu instrument are reduced to scale or chord tones.
Octave
Here, all events of an instrument in the selected marker range are shifted up or down by one octave.
<--|--->
Here, the time signature of the entire marker range is converted to the time signature of the style. This conversion is necessary when time signature changes also have to be played in YAMAHA® style. The result of this conversion can be found in the nimbu section F1. It contains the entire accompaniment including all tracks and instruments.
4. Export Style
In this group the set MIDI Export folder is opened to save the style.
Process Tab

This tab provides you with functions for editing your nimbu instruments.
Undo/Redo
Undo and redo functions for editing note events in the window in which you are currently working. Each instrument and track window in nimbu has its own undo/redo stack, which is also used for operations with indexed event areas.
Walk Through
Simulation of playing by moving back and forth step by step on the time axis to view the current status in almost all windows with time-dependent presentations.
Harmony Monitor
Monitor for analysing the harmony of individual tracks in conjunction with the walk-through function.
Import from Session Files
Select and import individual sections, instruments, and tracks from another nimbu SessionFile. This import is independent of the respective Accompany or Compose mode. This function can be used to load title related accompaniments from other session files into a new composition, for example.
1. Select Instruments to Process
Selection of the occupied instruments for the execution of the following 7 functions.
2. Process
Select the function to be performed with the selected instruments. The following functions are available:
1. Octave shift up and down for the instruments bass to chord 8
2. Integration of events inherited from another section
3. Deletion of event duplicates
4. Reduction of events to scales in order to integrate out-of-scale events into the scale so that the instrument only plays in the scale.
5. Reduction of the events to chords, i.e. to the upper scale levels 1, 3, 5 and 7, so that the instrument only plays chords.
6. Deletion selected nimbu instruments
7. Quantizing selected nimbu instruments to the set value
Chord Scales
Recalculation of the chord scales from the accompaniment and its chord progression.
Allocation of standard scales to the calculated chords.
Perform Tab

This is the tab for your performance. With these options, nimbu supports you in practising, playing and live performances. At this point you can also provide even more drive and groove through dynamic and temporal accentuation.
Keyboards
Calling up the graphically displayed keyboards:
Status Keyboard shows the currently pressed keys on the connected MIDI keyboard.
Demo Keyboard shows the keys to be pressed for melody and harmony while playing.
3 Fingering Keyboards to display and define better playable inversions.
Scales Keyboard shows the notes of the current scale when playing.
Practice
nimbu supports practicing a song by displaying the notes played in real time. For example, if you want to practice the melody notes of the Melo 1 track, select this track here. nimbu will then draw the notes you play yourself under the given melody notes, which will be recorded in another track. In this way, the timing of the notes can be compared immediately when playing. Octave Shift adjusts the octave position of the display of played notes so that the entire setup can remain as it is for practice.
Performance Panels
Calling up of the Touch Panels to control nimbu completely at your MIDI keyboard via a touch screen. nimbu can be operated with its integrated synthesizers directly on low-cost notebooks and tablets with touch screen.
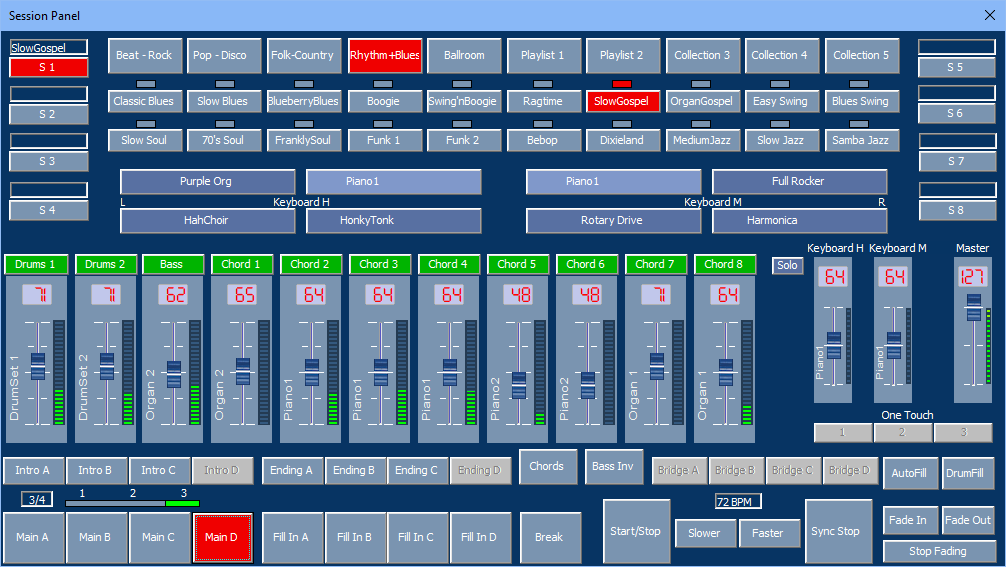
Display of the time signature with playing position within the bar. One Touch 1 to 3 are presets of the instrument setup. With Chords, the accompaniment can be spontaneously reduced to chord tones.
nimbu also supports different time signatures and fill-ins with several bars within an accompaniment. In addition, nimbu also knows so-called NoMarkers, in order to be able to terminate marker sections in accompaniments that have been calculated from MIDI files.
nimbu also supports different time signatures and fill-ins with several bars within an accompaniment. In addition, nimbu also knows so-called NoMarkers, in order to be able to terminate marker sections in accompaniments that have been calculated from MIDI files.
With nimbu you get 100 fantastic rhythms, divided into 5 genres, which can be accessed via this Session panel. There are also 5 collections for 100 of your own accompaniments or your own playlists, so up to 200 accompaniments can be accessed via this panel. The sessions and the names of the collections, playlists and sessions can be set by the user. You can create as many Panels as you want.
If sessions are called up via this panel, nimbu automatically switches on Performance Mode. In this way, the processing and performance of accompaniments are basically separated from each other. The Performance Mode suppresses everything that could disturb on stage. It can also be completely controlled via master keyboard.
Basically, all functions of the Session Panel can be controlled via MIDI controller or master keyboard. This also applies to the mixer controls that are assigned to the knobs on a master keyboard. If the levels are preset per session, endless knobs must be used when playing.
Lyrics
Opening a window for editing the lyrics of the song. This window shows the current lyrics position while playing.
Velocity Progression
Opening a window for editing the velocity progression, which modulates the attack dynamics of the instrument events in the range 0 - 100%. The result can also be transferred to the velocity values of the events themselves. In this way, dynamic accentuations, but also fade-ins etc. can be created.
Groove Progression
Calling up a window for editing the course of temporal accentuations, which can be adopted in the event track as a fine structure.
Set 768th Time Shifts to Selected Events
In this group, indexed event areas are shifted by 768ths. The positive or negative time shift can be random, fixed, or ascending or descending with the scale step or note pitch.
Tuning
In this group the overall tuning of the sound modules connected to nimbu can be adjusted for the interplay with other instruments.
Setup Tab

In this tab you can make settings for the instruments, MIDI devices, folders and special functions.
Instruments
Selection of percussion instruments for drum 1 and 2
Calling up the mixer with settings such as octave position, MIDI channel, bank and program
Calling up a control panel for setting a maximum of 7 controllers such as modulator, position, reverberation etc.
MIDI
Selection of the MIDI interface for the keyboard incl. channel filter
Selection of MIDI interfaces for controlling nimbu
Selection of MIDI devices for sound generation
Calling up a MIDI IN monitor to check the keyboard connection
Synthesizer
Calling up the two integrated synthesizers to set up audio devices and SOUNDFONT® libraries
Instrument Setup
Enabling each section to load its own instrument setup "on the fly".
Transfer of the instrument setup from the current section to the global setup of the session.
Transfer of the global instrument setup of the session to the setup of the current section.
Folder
Setting the default folders for
nimbu Session Files
Midi Import Files
Midi Export Files
SOUNDFONT® Sound Libraries
Display
Displaying the scale steps of the instrument events.
Displaying of the so-called Avoid notes on the scale keyboard.
Switching the display and editing resolution to 64ths in all event windows.
Display of the fundamental tones with the accidentals # or b.
Computation of Harmony
nimbu automatically calculates the harmony progression with its chords and scales from a MIDI file. Some settings are used in this process, which can be changed at this point. These are settings that
only one single track should be used for this calculation.
chord alterations should be resolved as for a transition from G to G7 and not be combined as G7.
chords of very short duration and/or little difference to the other harmony progression (fine structure) are not resolved.
in the case of chords without a third (so-called power chords) an extended major/minor resolution is made.
Adjustments
When calculating the accompanying instruments from MIDI files, nimbu automatically adjusts the rhythm, e.g. to avoid transposition at the beginning of a scale step event when a chord change occurs, or to ensure correct transposition in case of longer lasting tension tones. The settings can be changed here.
Transpose
When importing MIDI files and keyboard styles, nimbu automatically sets the transposition settings.
With "Settings" a window is opened in which all settings for transpose are displayed. In addition to scale-based transpositions, nimbu supports all YAMAHA® transposition types. Here you can set the inversion modes and the so-called High Key Parameters (the fundamental note of the played chord up to which transposition is performed upwards). For the Keyboard Styles, these settings are listed separately for each category and for each marker.
Users with the appropriate know-how can make their own settings here. Certain settings automatically trigger a recalculation of the instruments so that the accompaniment does not deviate from the original.
The Universal Style checkbox is automatically selected by nimbu when the source of the accompaniment is a YAMAHA® style, which has a fundamental effect on transposition.
Style Import
With Filter as of, the range of notes is restricted when importing YAMAHA® styles, for example, to exclude the import of notes for the so-called MegaVoices.
Furthermore, you can set that XG® percussion instruments are translated into General MIDI 2 (GM2) percussion instruments when importing styles.
With Direct, YAMAHA® styles are loaded and played directly in the MIDI Import tab.
nimbu - playing like a real band. Experience it for yourself. In just a few minutes. Here is our offer.
"SOUNDFONT" is Registered Trademark of E-MU Systems, Inc., 95067-0015, Scotts Valley, US
"YAMAHA" ist Registered Trademark der YAMAHA CORPORATION, Hamamatsu-shi, Shizuoka, JP
"XG" ist Registered Trademark der YAMAHA CORPORATION, Hamamatsu-shi, Shizuoka, JP